How to Create, Share, and Manage a Poll
Creating a poll and managing it is simple but powerful. Follow this guide step-by-step, and you’ll become a pro!
Step 1: Start Creating a Poll

- Tap the ➕ button on your screen.
- This will open the poll creation flow where you can set up your new poll.
Step 2: Define Your Poll Question

- Enter the main question you want to ask your participants.
- Optionally, you can:
- Attach an image to visually enhance your question.
- Add a link for more context or resources.
✅ Tip: Keep your question short and clear for best engagement.
Step 3: Choose How Participants Will Answer

You have four ways to set up how answers are collected:
- Manually enter answers: Type your own list of choices (e.g., Yes, No, Maybe).
- Select from the calendar: Perfect for scheduling polls like "When should we meet?"
- Pick from predefined standard answers: Save time with templates like "Agree / Neutral / Disagree".
- Open question: No choices provided. Participants will freely type their own answer.
✅ Tip: Use the right format based on the goal of your poll!
Step 4: Add, Remove, or Modify Answers

If required:
- Add new answer options.
- Remove any options you don't need.
- Modify existing answers by tapping into it.
- You can optionally:
- Attach images to each answer.
- Add links for more details.
Step 5: Tune Poll Options

Customize how your poll behaves by adjusting settings such as:
- Letting users select multiple answers.
- Making the poll anonymous or non-anonymous.
- Allowing participants to change their votes after voting.
- Setting vote limits, result visibility rules, and more.
👉 For a detailed explanation of each setting, read Poll Options Explained
Step 6: Review and Create the Poll
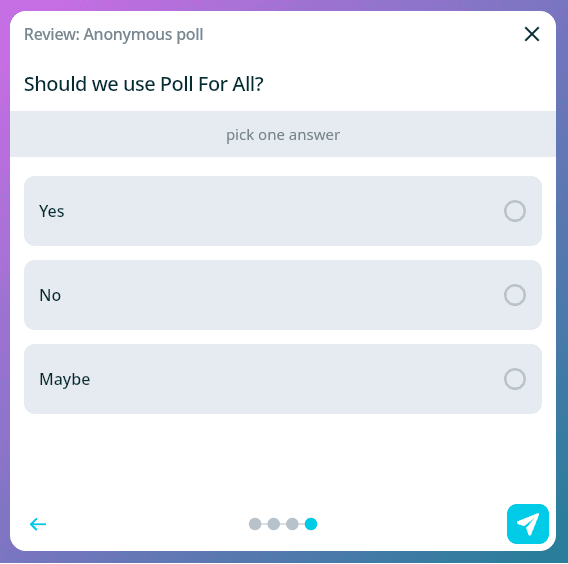
Before submitting:
- Check the question, answers, and settings one last time.
- Make any final edits if necessary.
- When you’re ready, click Send Poll Icon to submit it!
Step 7: Share Your Poll

After creating your poll, it’s time to invite participants:
- Copy the poll link and share it through messengers, email, or anywhere else.
- Generate a QR code for in-person sharing.
- Post it directly on social media platforms.
Step 8: Observe Poll Results in Real Time

- Open your poll at any time in the Poll For All App to watch votes come in live.
- Results are updated in real time as participants submit their answers.
- If your poll is non-anonymous, you can receive notifications when someone votes.
Optional: Modify the Poll If Needed

- You can edit the poll question, update answer options, or change settings even after publishing.
- All edits are applied immediately and visible to participants.
✅ Tip: If major changes are made, it’s a good idea to let participants know!
Optional: Pause, Resume, or Stop the Poll
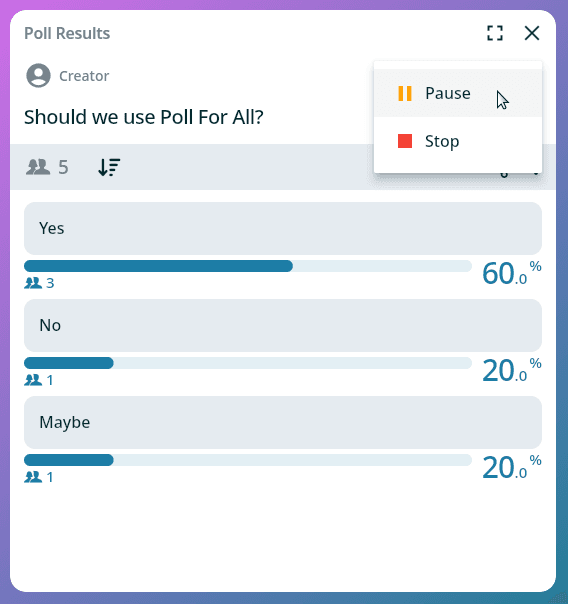
- Pause: Temporarily stop voting (useful during maintenance or meetings).
- Resume: Allow voting again.
- Stop: Close the poll permanently to finalize results.
✅ Tip: Stopped polls can be reopened by modifying its end date in the poll options!
Optional: Export Poll Results

- Download your poll results easily for review or reporting
- Summary exports are available for free.
- Detailed exports (with more participant information and deeper statistics) are available with a premium upgrade.
Ready to get started with Poll For All?
Our free plan gives you access to all the essential features